
This tutorial takes a little time and patience but trust us when we say it’ll be worth it in the end!
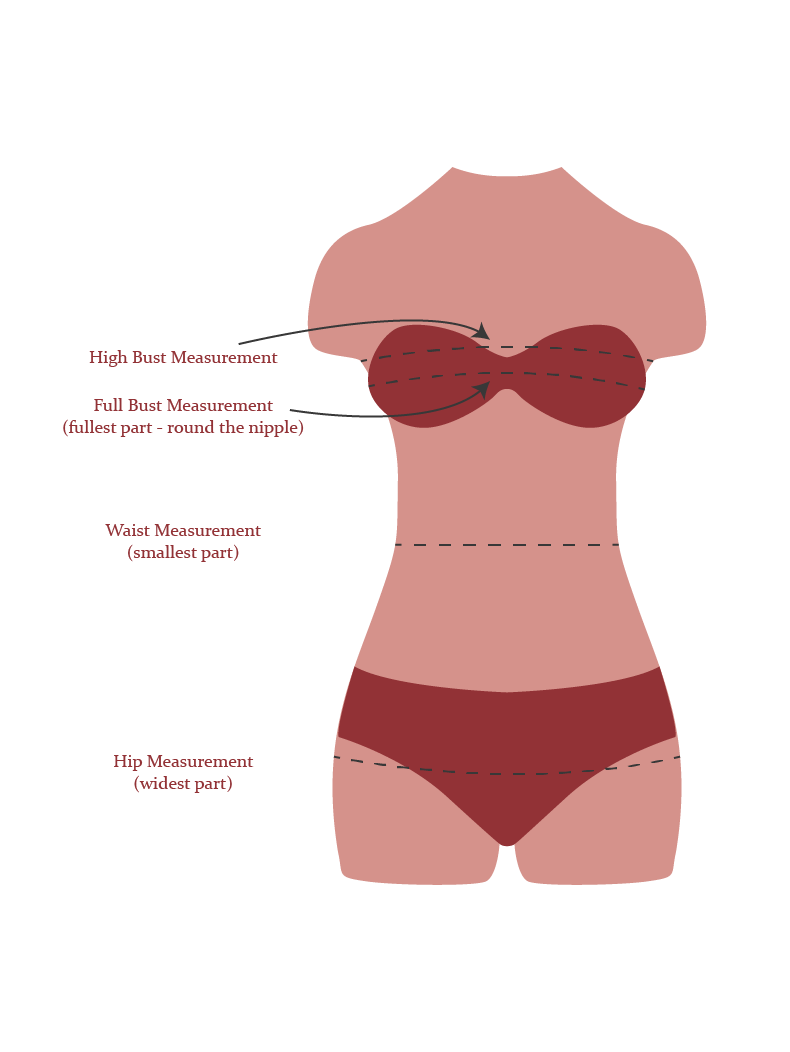
The measurements you need to create The Sun Dress include, the bust (fullest part of your bust – over the nipple usually), waist and hip measurement.
A small bust adjustment is adjusting a sewing pattern to make it smaller across your bust. This is fairly straightforward but you’ll need to follow these few important steps to create an accurate adjustment.
Using your measurements, choose which size closely relates to your body measurement, you should choose the measurement corresponding to your largest size.
For example, your bust measures 90cm, your waist measures 74cm and your hips measure 98 cm, you should choose the size 3 (UK12) to make The Sun Dress.
You’ll notice that your waist and hips closely match those on the sewing pattern but your bust is smaller. The bust measurement on the sewing pattern for that size is 94cm, which means the sewing pattern needs altering by 4cm.
The Small Bust Adjustment you’ll be making will be 2cm (half 4cm because we are working with half the pattern).
We now need to establish where the bust point is:
Before we go any further, it’s important to note we will be cutting up your sewing pattern. It’s always better to trace off your original sewing pattern rather than cutting up your original, that way you have the original copy to refer back to and intact in case you want to make any other pattern alterations. Make sure you copy across all important balance marks and other marks such as the grainline!
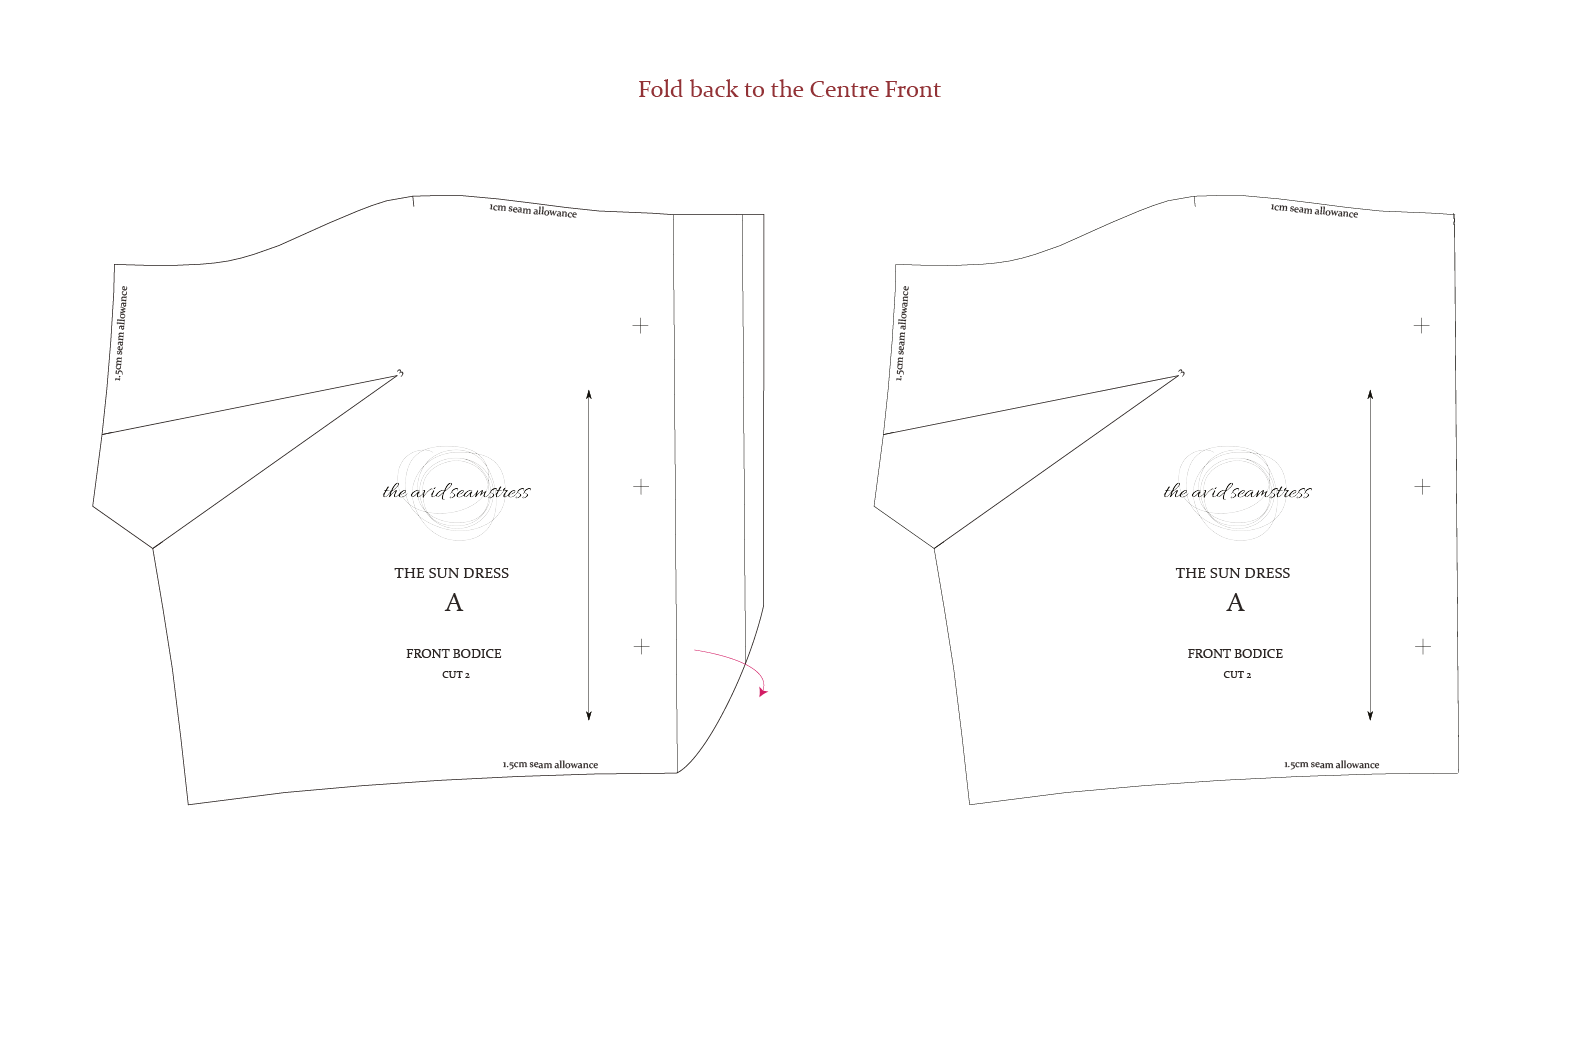
Ok, now we have a copy of our pattern, we can get started. Firstly, fold your front bodice pattern piece along the line next to the button balance marks to help find the centre front:
Next, stand in front of a mirror and place the bottom of your front bodice pattern piece on your waistline. Make sure the button balance marks (crosses) are in the centre of your body, the side seam should be 1.5cm further round towards your back.
Then we need to mark a point on the pattern indicating the bust point. This is the fullest part of your bust usually around the nipple area. Mark this on your sewing pattern.
Ok, now we are going to draw a vertical line on your pattern down to the hem of the piece, which is the waistline. Make sure this vertical line is parallel to the Grainline and Centre Front, where the buttons are located.
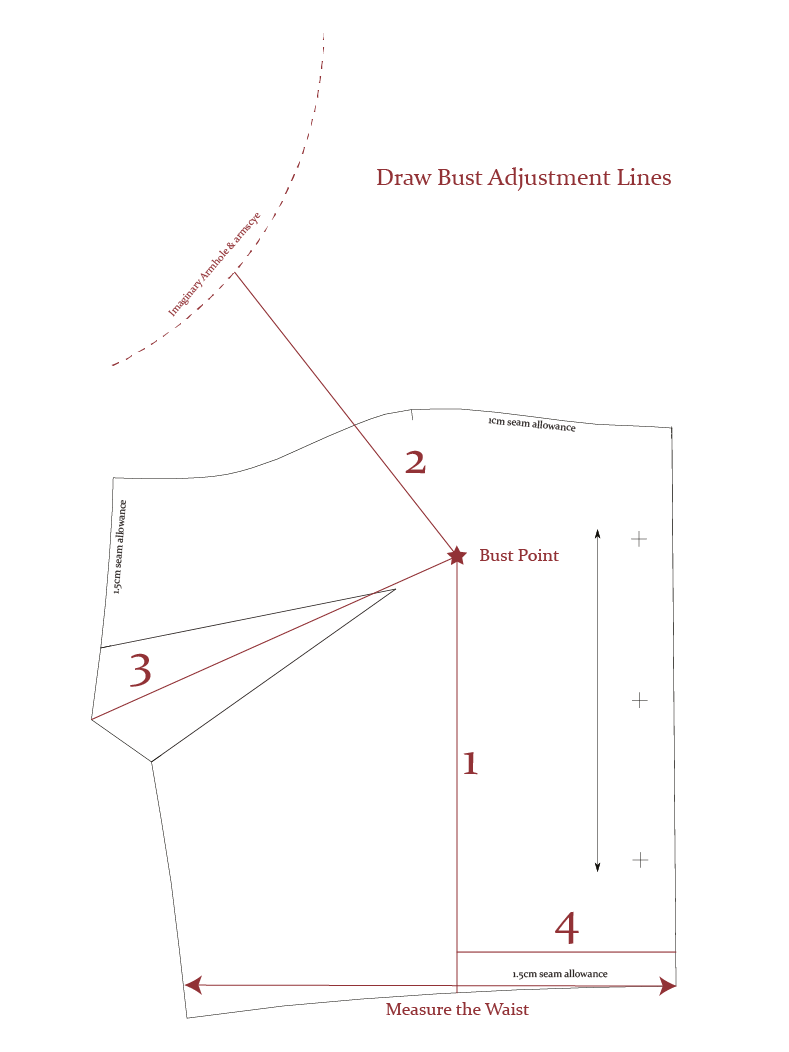
From this line, draw another line, this time going up towards the armhole so it hits the armhole around the lower third – this should be somewhere near the armscye.
PLEASE NOTE: This sewing pattern has a front band above the bodice which doesn’t have an armhole, use the image as a guide to position your second line, it should be somewhere to the left of the balance mark. Don’t worry too much about the position of this – it’s just a guide.
The next line we need to create goes through the centre of the existing bodice dart and meets the first line at the bust point.
The last line to draw is a horizontal line near the hem of the bodice about 2cm from the waistline.
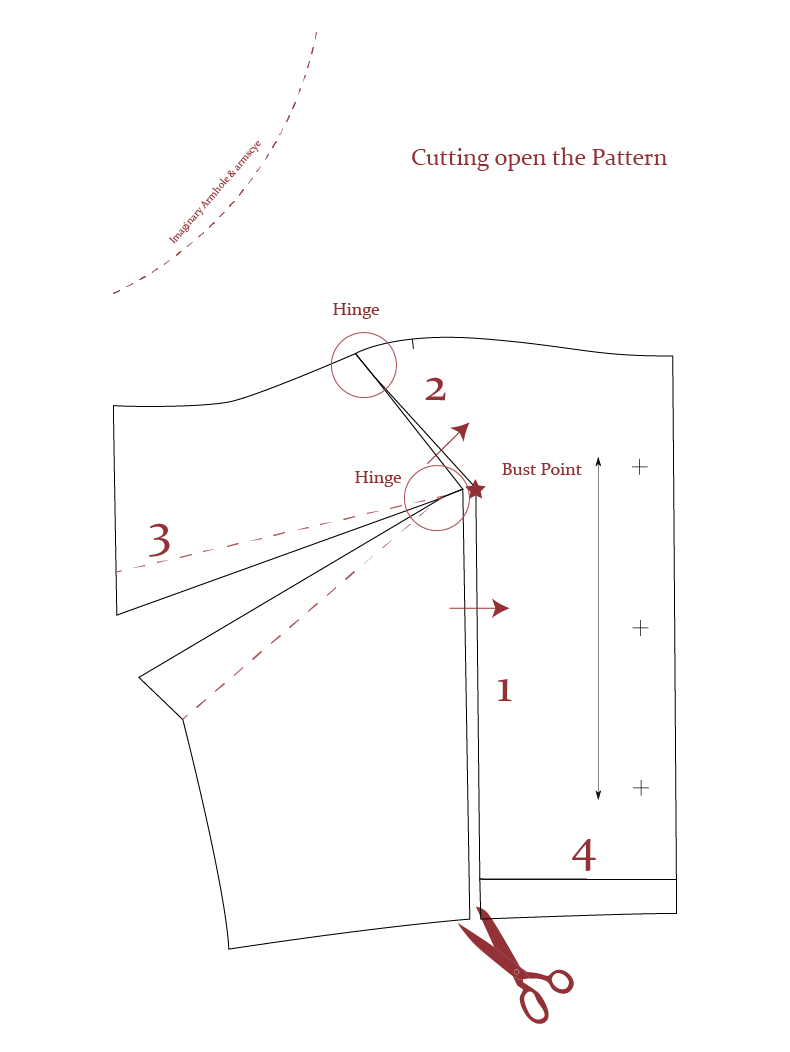
Before we can get scissor happy, it’s wise to note the measurement of the bodice from the Centre Front (where we folded back the front placket) to the side seam. We will need to use this measurement later on!
Now for the fun bit! Using a pair of paper scissors, cut up line number 1 through the bust point up to line number 2 stopping about 0.5cm from the edge of the pattern. This creates a little hinge for us to use and open up the pattern.
Cut through the middle of the dart towards the bust point, again stopping 0.5cm from the bust point to create a little hinge to move around, which will open up the bust dart.
Don’t cut along the line at number 4 just yet (this is only needed for a FBA).
Move the darted side of the bodice over 2cm towards the centre front overlapping the cut line number 1, make sure to keep these lines parallel to each other!
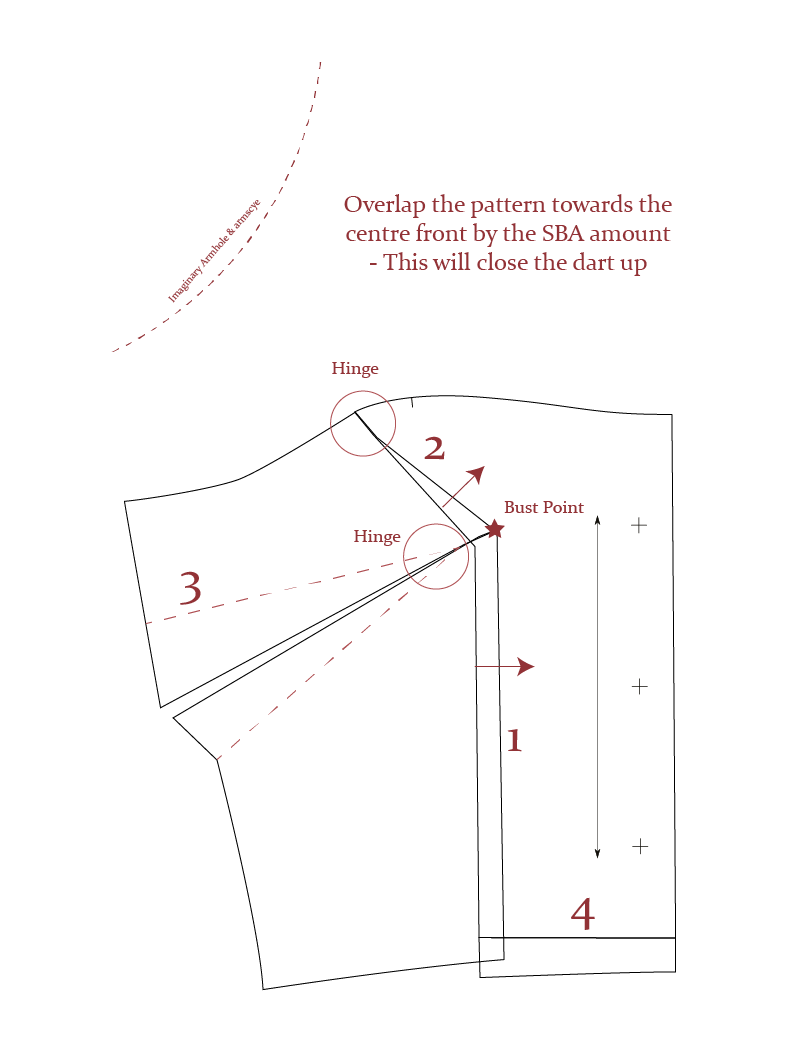
The dart will close up slightly as you draw the pattern closer to the original bust point, which is what we want. Tape the pattern piece in position.
You’ll notice that the “armscye” – top of the bodice is perhaps a little distorted now, even this up with a smoother line.
The hem of the bodice at the waist will also be uneven, even the hem up with a smooth line.
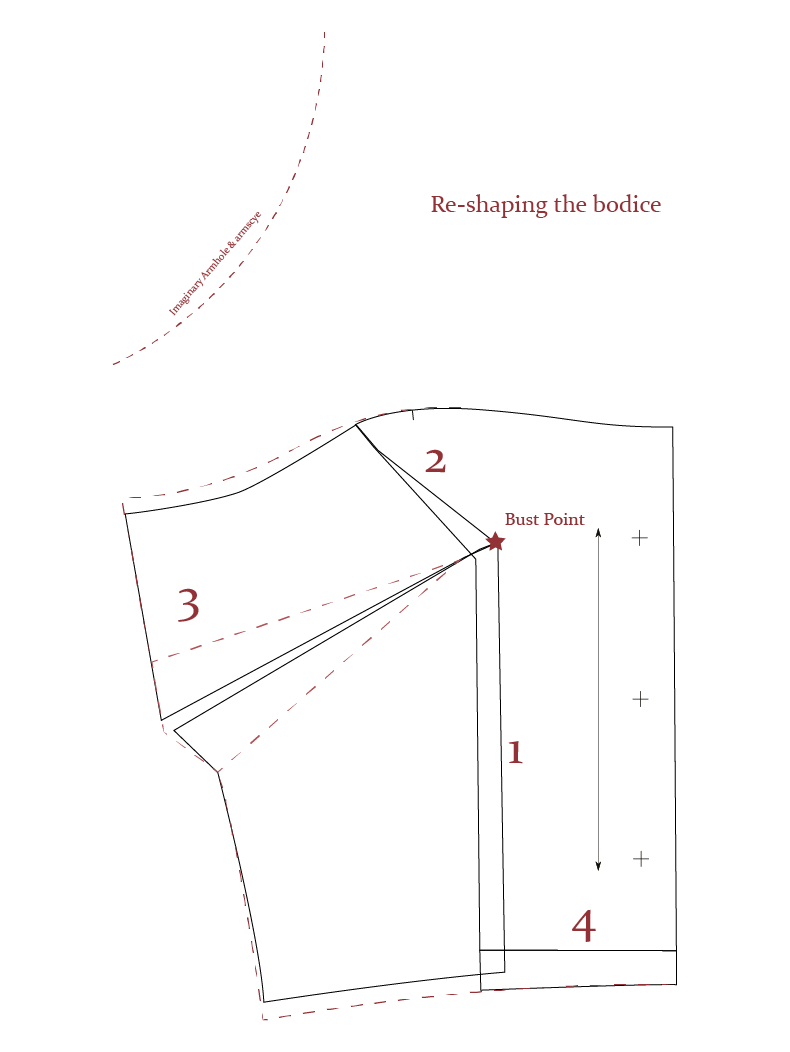
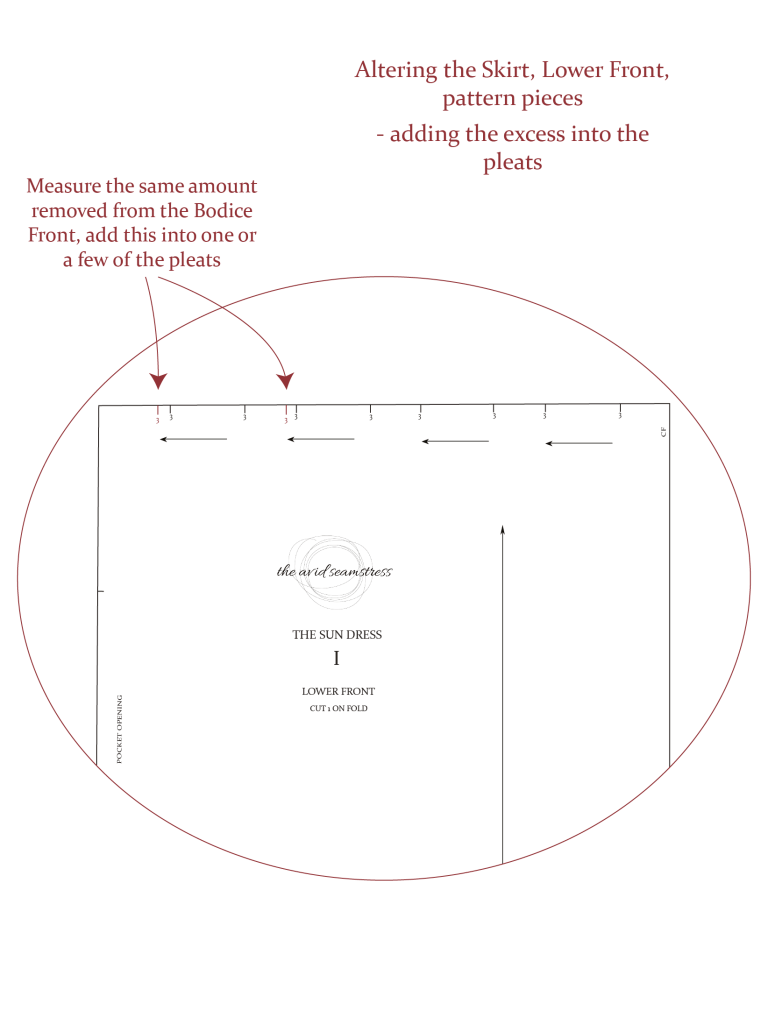
Now that your bodice is adjusted, you will need to make alterations to the skirt, because you have taken volume out of your bodice. The skirt waist may now be too wide, there are two ways to tackle this.
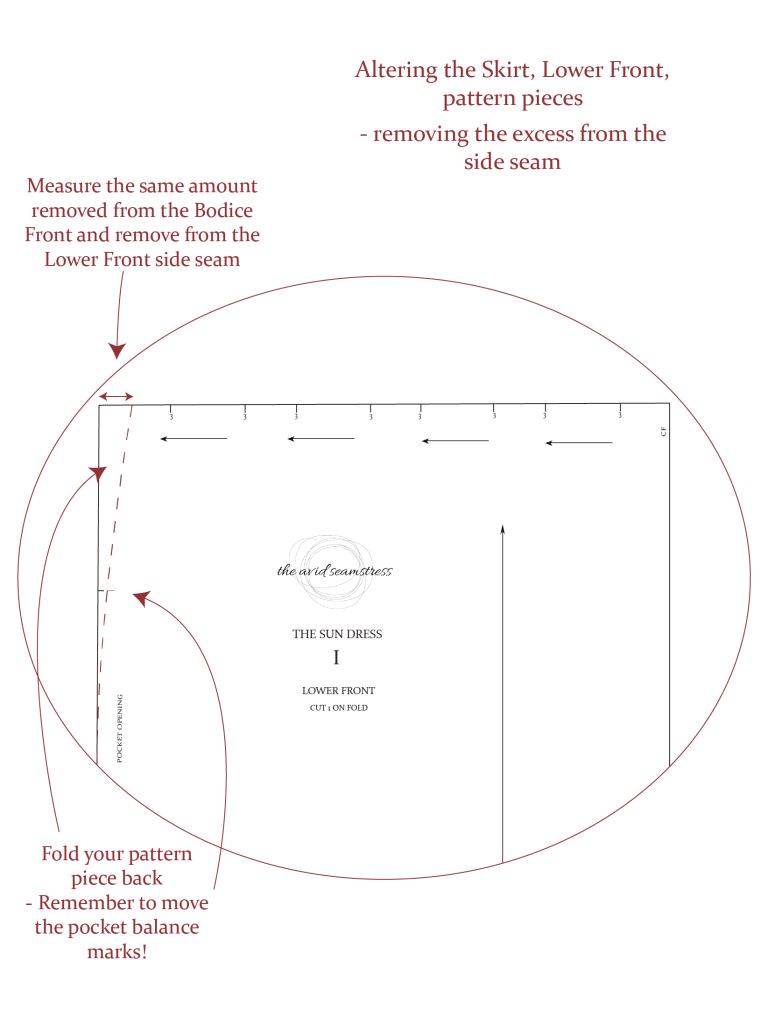
Firstly you can remove volume from the skirt by taking the same amount which was taken from the bodice front out of the side seam of the skirt. Mark this on your lower front pattern piece and fold it back creating a smooth side seam – IMPORTANT remember to transfer your pocket balance marks!
Alternatively, you can pleat the extra fullness into one of the pleats on the skirt. This will of course make the skirt fuller so this is personal preference as to which you would like.
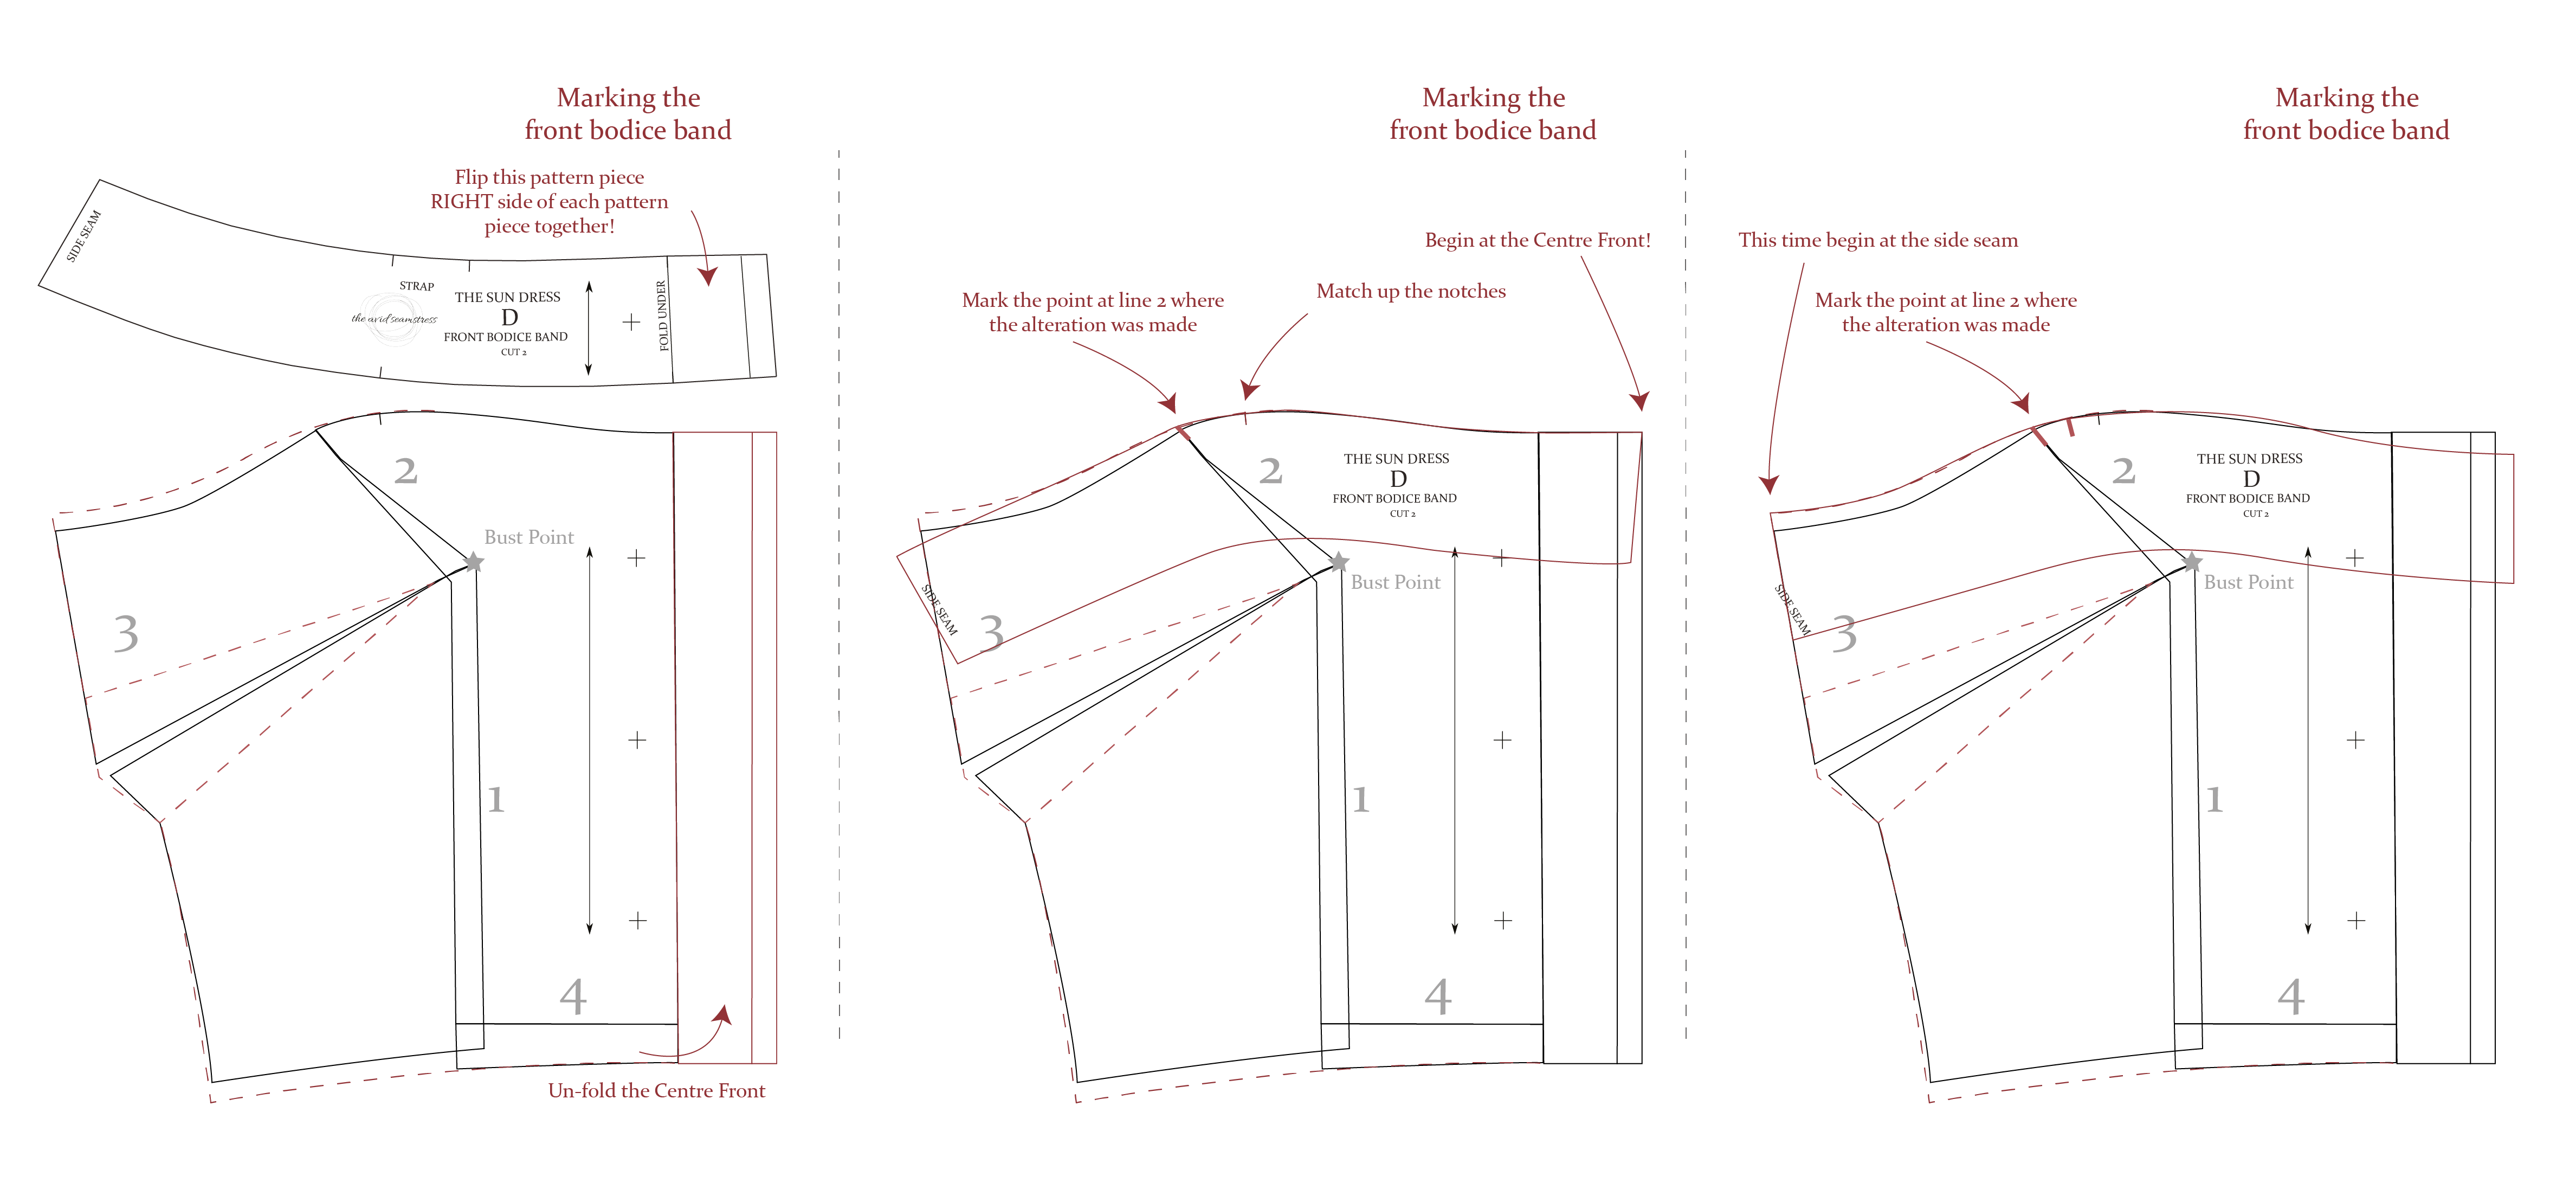
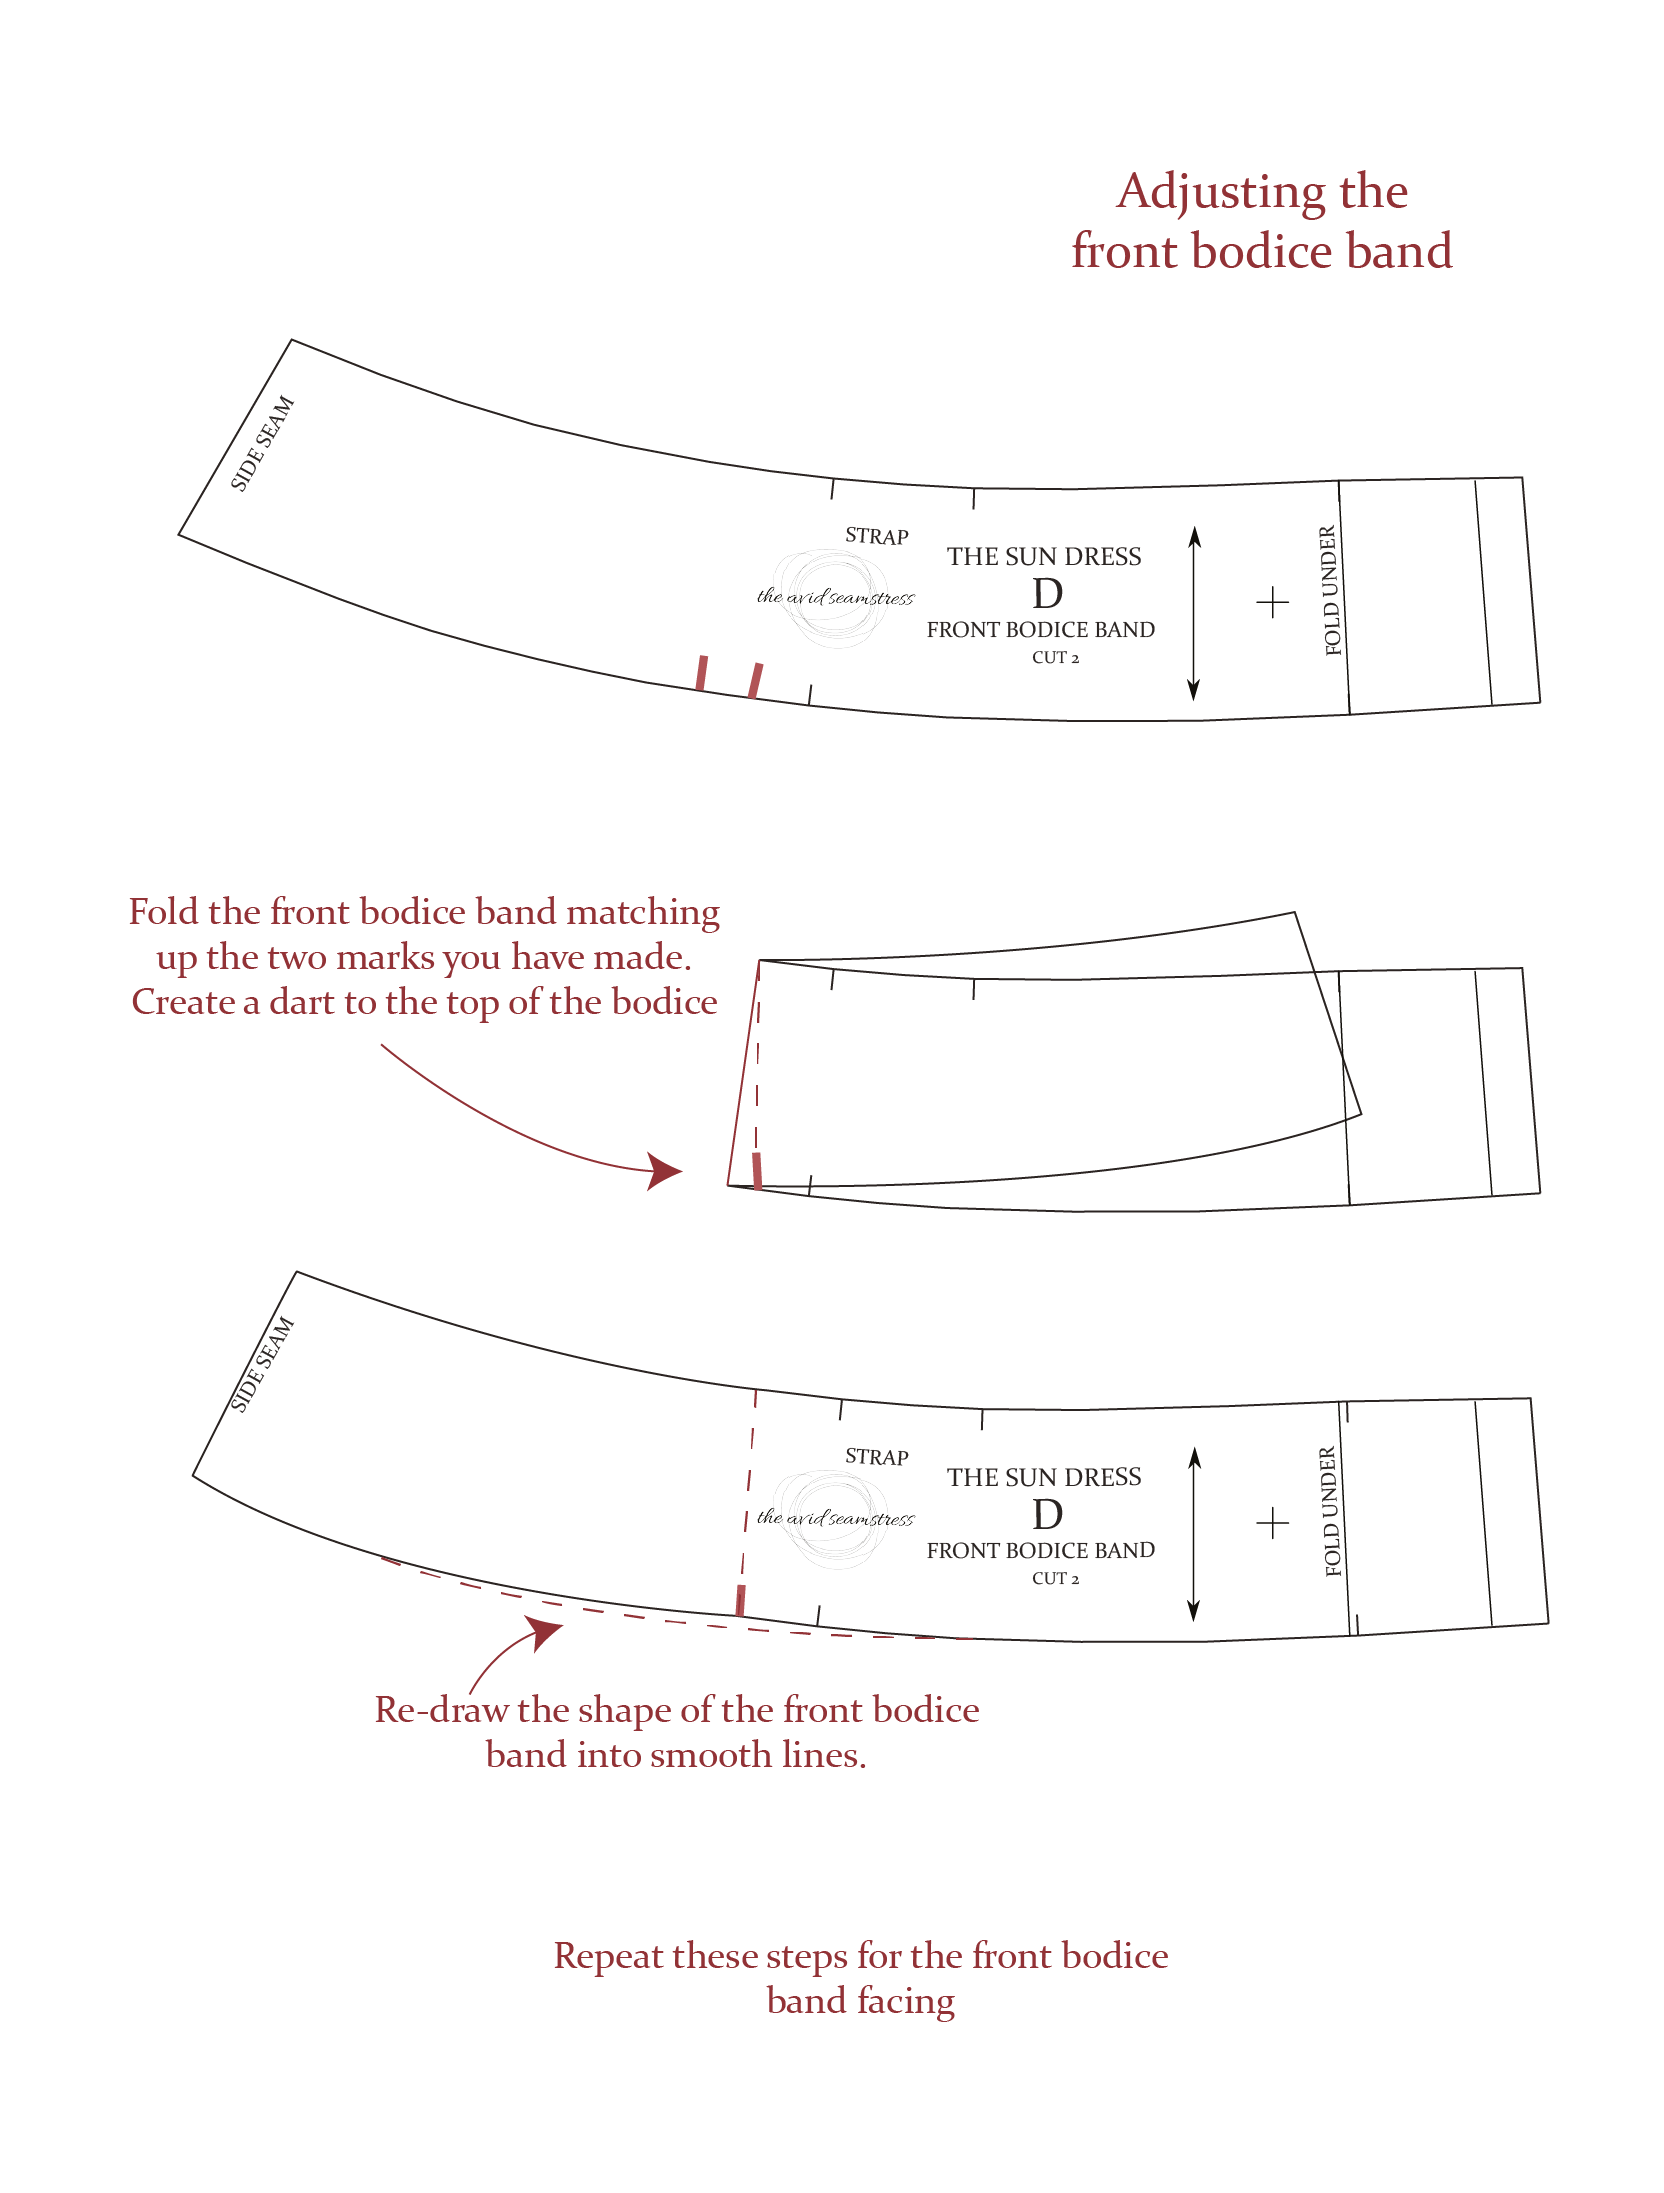
You may also find that your front bodice band and facing are now too long to fit to your bodice, depending on how much fullness you took from the bodice front piece. The best way to combat this is to align your new bodice pattern and the bodice band starting at the centre front – remember to unfold the centre front of your bodice.
With the RIGHT sides of your two pattern pieces together, begin at the centre front and smooth all the way along to the notch, then find the place on the bodice which was altered (top of line 2) and mark this on your front bodice band.
Now repeat this step starting at the side seam. This will reveal how much space needs to be removed from the top bodice. Fold these two lines together creating a pleat/dart in your pattern piece. Re-shape the upper and lower edges to smooth lines as necessary.
Repeat this step for your front bodice band facing.
And there you have a Small Bust Adjustment. We recommend toiling your new pattern, either with just the front and back pieces to check they fit you as desired across the bust or create a wearable toile which you can keep tweaking if necessary, you can also test out the fullness of your new skirt, you may find you’d prefer to take the excess out of the side seam!
If you need any help along the way, don’t hesitate to contact us at hello@theavidseamstress.co.uk
