
We love our Day Dress so much and think it’s such a flattering fit with the gathered waist but since we saw Gerda’s pleated skirt version we have been dying to try it!

Planning our outfit for the Sewmance Festival this weekend (Saturday 3 June) we had a nosy in our fabric stash and decided to finally use this gorgeous cotton lawn fabric that we’ve been holding on to for awhile! We knew we had to make The Day Dress in this fabric but with a pleated skirt, instead of the gathered waist!

Here’s how we did it!
We are doing the tutorial on size 3 so you will need to adjust the measurements depending on the size you are making.
ON BACK AND FRONT BODICE PIECES
- Sew your bust and waist darts on your front and back bodice pieces.
- Iron your waist darts towards the side seams/bust dart downwards.
- Overlock/zig-zag stitch your edges.
TIP – We sew our bust darts and then overlock the side seam – it’s just so much neater and easier than trying to overlock this section first.
FRONT PLEATS
- Place your front bodice and front skirt right sides facing you, ensuring that you have marked the CF on both.

- On the bodice measure the distance between the sewn darts.
- Mark this on either side of the CF on the skirt – see the red pins below.
- We will start the pleats on either side of the red pins.

- Here is a close-up to illustrate where the dart sewn line is matching up to the red pins.

Now, here is where you will work out your measurements depending on the size you are making. If you are making size 3 you can just follow ours (lucky!).
It’s important to note that when you are working out these measurements below you are working on one side of the front skirt. You then use these measurements on other side.
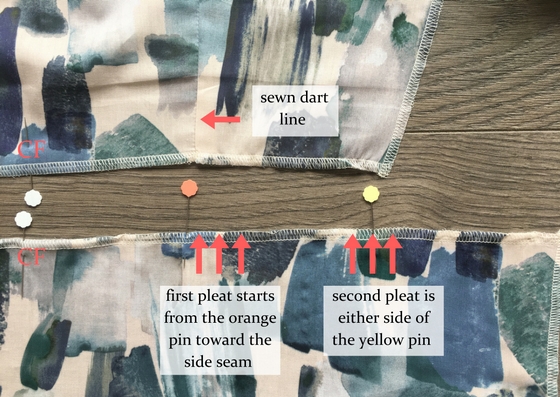
- On the skirt – Measure the distance from the red pin in the previous step (now looking very orange in our pic below – the pin head has swivelled around to the other side which is obvs orange!) to the side seam. Our measurement is 23cm.
- On the bodice – Measure the distance from the sewn dart line to the side seam. Our measurement is 12cm
- Minus the bodice measurement from the skirt measurement. Our example 23cm – 12cm = 11cm
This measurement is how much extra fabric you have on the skirt piece to use for pleats.
- The orange pin is your first pleat location.
- We want 2 pleats so divide the measurement in half. (Ours = 11cm divided by 2 = 5.5cm). You can now use this measurement to mark your second pleat mark away from the orange pin.
- So each pleat uses 5.5cm of fabric.
So you now have your first pleat mark (orange pin) and your second pleat mark (yellow pin).

- Our first pleat starts at the orange pin and will on the side of the pin closest to the side seam.
- Our second pleat is on either side of the yellow pin.
To make the first pleat:
- From the orange pin, measure your pleat width (ours is 5.5cm) and pin (our orange pin below).
- Find the middle of these two orange pins (ours is 5.5cm divided by 2 = 2.75cm) and mark with a pin (our green pin below)
- This is your pleat. The two orange pins are going to meet at the green pin with the fabric at the wrong side.

- Take one side of the orange pins and fold towards the green pin. Use the orange pin to hold in place.

- Repeat on the other side of the pleat.
You have now created your first pleat.

To create your second pleat.
- Your pleat needs to be either side of the yellow pin. So if the total of the pleat is 5.5cm, half of this is 2.75cm – so each side of the pleat is 2.75.cm
- Mark with pins and fold towards the yellow pin.
You now have your second pleat.


- We don’t want these pleats moving around when we sew them so hand stitch them in place, across and down the pleat but keep your pins in place too.

- Repeat all the steps above on the other side of the front skirt.

- Place your bodice and skirt right sides together and match up the edges. Can you see how, now that the skirt is pleated, it should fit in to the bodice piece.

- The dart should meet up with the middle of your first pleat.


- Pin in place – can you see how our pins are placed? – these are strategically holding the pleats in place.

- Sew using a 1.5cm seam allowance.
- Remove the hand sewing.

- Here is the underside of the pleats – nicely folded ;)

- The right side of the bodice. Look how beautifully those pleats are meeting up with the dart line :)

- A close-up:

BACK BODICE
Phew – much easier than the front as we only want 1 dart on either side of the skirt.
- As before, see how much fabric you have left over from the bodice and the skirt. You can do this easier by placing the pieces as shown and measuring the extra fabric on the skirt piece. This is how much fabric you have to use for the pleat.

- Fold your skirt piece in half and pin.

- Pin half the width of your pleat on either side of your pin.

- Pleat each side towards the middle pin.
- Hand stitch in place
- Sew the back bodice to the skirt and voila your back pleat is done.


I hope that didn’t seem too complicated! Basically, you can decide how many pleats you would like to have – you just need to divide up the “leftover” section of the side of the skirt.
You can also change the location of your pleats. You could have them right next to each other – just repeat whatever you do on the one side on the other side.
You can also decide if you want your pleats to start closer to the CF. I just like mine starting from the dart line. It’s your choice!
Have fun and don’t spend ages agonising over where to put the pleats. Use the above as a guideline. Pin the pleats and then check that the skirt piece fits into the bodice piece – if it does then go for it !!


I love a good pattern hack and this was so interesting. I love the Day Dress so it was good to see the pleats added. Thanks
Thank you Sheila. I love the Day Dress with pleats – such a versatile dress