
… you ready to start pinning your pieces and cutting them out? Exciting!
If you have just joined us head over to the start of our sew-a-long and catch up – we’re not rushing ahead and you can join at any point!
Have you worked with a layplan before? The purpose of a layplan is to show you how to lay the pattern pieces on to the fabric to use the fabric in the most economical way and reduce wastage. It’s important to note that there are a few things that can affect how you work with the layplan so let’s break it down like this:
FABRIC
Fabric generally comes in two widths – 112cm/44″ or 145cm/57″. So, ultimately there will always be at least two layplans (unless the pattern doesn’t fit on a narrow fabric – it won’t be given as an option) to show you how to fit the pieces on to either width fabric.
The thing that is going to affect your next step is whether you are using plain fabric or pattered fabric. If you are using patterned fabric your pattern pieces must always run in the same direction to ensure that the print isn’t upside down. If you are a beginner or fairly new to sewing we suggest using a plain fabric and avoid large pattern prints that need to be pattern matched!
THE SIZE GARMENT YOU ARE MAKING
Sometimes you will use a different layplan depending on the size your making. It’s really worth looking at all the layplans that come with your pattern and find the one that is right for what you are making!
For the A-Line Dress we have made it super easy and have given you the following layplans:
- 112cm/44″ Plain and patterned fabric for sizes 0,1,2,3
- 112cm/44″ Patterned fabric for sizes 4,5,6,7,8
- 112cm/44″ Plain fabric for sizes 4,5,6,7,8
- 145cm/57″ Plain and patterned fabric for sizes 0,1,2,3
- 145cm/57″ Plain and patterned fabric for sizes 4,5,6,7,8
So, first decide which size bracket you fall in to. Then, see how wide your fabric is. Now you can go to the layplan that fits whether your fabric is plain or patterned.
Before you start working with your fabric and laying your pieces down let’s look at the pattern pieces page:
Your pattern pieces will be printed on one side. However, this doesn’t mean that they will be put down on to the fabric with all the pattern printing facing up. Sometimes you will have to flip a piece over on to your fabric if that is what the layplan is showing you. The layplan is your guide BUT your pattern pieces are your key!
Each piece will have a grainline arrow – this is showing you the direction the piece needs to lay on your fabric. It is the most important next step in making your garment. The next crucial thing to look out for is whether your pattern piece says “cut on fold” – this means you need to lay it down on the fold of the fabric.
OK.. so where are we… we know which layplan we are following and now we need to get our fabric ready before we can start placing our pattern pieces down.
Have a look at our layplans for the A-Line Dress. Can you see that it says FOLD down the left hand side of the layplan? You need to fold your fabric in half across the width (so 112cm wide fabric now becomes 62cm wide when folded) – fold it so that your fold is on the same side as our picture – this will help you to follow the layplan easier.
Lay it down on your table or floor (anywhere you have a flat surface) and smooth it out so that the folded edge has no ruffles and each side of the fabric is flush against each other all the way down the length of the fabric.
If your fabric is super creased, why not give it an iron first? BUT don’t iron the fold flat…
Now you can start to lay your pattern pieces on to your fabric as shown on the layplan. Use the edge of your fold as your straight line and line up the grainline so that it is parallel to the folded line. This will ensure that your pattern piece is straight.
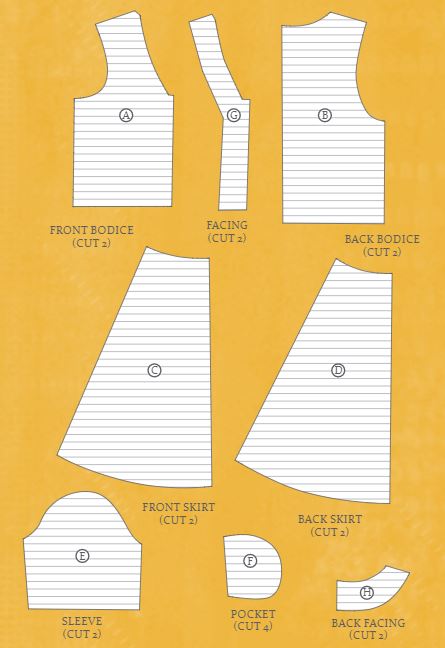
Lay each pattern piece out and check it against your layplan. Noticed something about those pockets?? Use the grainline on the pattern piece as your guide.
BEFORE you pin – check your pieces – notice the pocket needs to be cut out twice as you need 4 pocket pieces. You’ll need to pin and cut your first set of pockets and then repin and cut the next set.
PINNING
Pinning correctly can be overlooked – we see it as one of the most important stages of creating your own garments. Don’t pin too far away from the edge of the pattern piece – the purpose of the pins are to keep the fabric piece firmly on to the fabric so that when your scissors work their way around the pattern piece lies flat. This will ensure that your pieces are cut out accurately.
- Place pins strategically around your pattern piece and especially in corners, curves and areas that will be tricky to cut out.
Take your time and enjoy this part. Make a cup of tea, put some music on and relax in to making your garment. Don’t rush! It’s not worth it!
CUTTING OUT YOUR PATTERN
Woo hooooooo this is so exciting! Deep breath! Double check all your pieces and then, using your fabric scissors, start to cut out your pattern pieces. Slow, careful cuts.
TIP – If you are working with a space that means you can’t move around easily, why not cut away sections of the pattern pieces and work on an area at a time? Or, if you are working on the floor, cut around a piece and then take that piece to a flat table to really concentrate on cutting it out accurately.
I know we keep harping on and on about preparation BUT it’s important to remember that your sewing machine works with what you take to it. If you take a piece that has been cut out accurately, it will just fit together and sew beautifully. If you hack it to pieces when you are cutting it – your sewing is going to be hard!
Right – we’ll leave you alone to cut out your pieces; take your time and enjoy… when you are ready come back and in the next article we will mark up your notches, darts and overlocking your pieces…
If you’re sharing your pics with us on social media use the hashtag #sewingthealine or sewingthea-linedress and tag us @theavidseamstress so we can follow what you are making!
