

Taking your measurements correctly is the most important part of making your own garments from sewing patterns. This critical stage of making your own garments is often overlooked.
Golden rule: Never assume your size. Sewing pattern companies use different measurement tables for their patterns. You may be a size 10 using pattern company A and a 12 using pattern company B. This is especially important for making children’s garments, as a size 5 may fit your 4 or 6 year old.
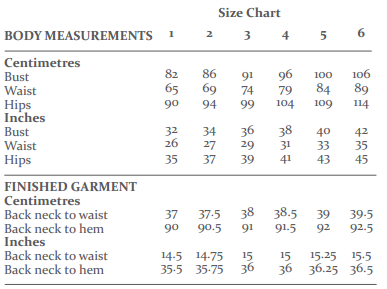
What’s the difference between body measurements & finished garment measurements?
You’ll notice that there are two sets of measurements on the back of patterns:
– “body measurements” are your body measurements so you shouldn’t add any ease when taking the body measurements.
– “finished garment measurements” are giving you an idea of how the garment will fit once made. At the pattern drafting stage ease is added on to the body measurements so that you are able to wear the garment comfortably.
How to take your measurements:
Take your measurements using a soft tape measure as this will be provide the greatest accuracy. Write down your measurements using our guide below and then, take them again. You won’t believe how easy it is to take the first set of measurements and hold the measuring tape too loose or too tight!
Slip into some comfy underwear to take your measurements so that you can get the closest measurements possible! It’s a great idea to take your measurements in front of a mirror so that you can see whether you are holding the tape accurately.
Bust
Measure around the fullest part of the bust, raising the tape slightly at the back.
Waist
No sucking your tummy in! Use the tape to circle around your waist just above your belly button.
Hips
Measure around the fullest part of your hips, making sure the tape is placed over the largest part of your buttocks.
Inseam
Measure from your top inner leg to the bottom of your ankle. Or, if you know the desired length of your trousers, measure to that length. Alternatively, measure the inner leg of a pair of owned trousers that fit your desired length.
Top tip – Are you making trousers that you are going to wear heels with? Don’t forget to take that into consideration.
Sleeve length
This is a difficult measurement to take on your own as your arm needs to bend. Bend your arm at a 90-degree angle and then, starting at the shoulder, pass over the elbow to the wrist.
Ok all set. Have you taken the measurements again to be sure? Once you have the measurements, find the corresponding size by using the size chart printed on the envelope. Find the size that is the best fit using the waist, hip and bust measurement.
Between sizes? If you find that you are between sizes, we recommend you make the larger of the two.
We always advise making a toile (mock up) of the pattern. This way you can be absolutely sure it fits your body shape before you cut your lovely fabric. You can then decide if you want to go up a size for a looser fit, or make adjustments to the master pattern.
Happy sewing!

What cup size are your patterns drafted for? B?
Hi Suzy – a B cup :)
what height are your patterns drafted for?
Hello Annica, our patterns are drafted for 157m but are easily adaptable for height :)