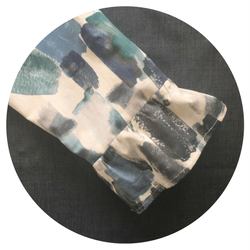
I made this gorgeous tie sleeve for the Day Dress and had so many compliments! Here’s how to do it.
Firstly, you need to lengthen the sleeve as shown here and then trace the pattern so that you have a copy to work on.
Step 1 – measure 5cm to the right of the middle sleeve line and draw a line down the length of the sleeve. As shown in the drawing, you now have the front of your sleeve and the back of your sleeve.
Step 2 – At the hem of the sleeve, measure 7cm and mark. When we sew the sleeves together we will only sew down to the 7cm mark.

Step 3 – separate the two new sides 
Step 4 – place and glue a piece of paper on either side of the sleeve pieces and add on a seam allowance of 1.5cm

Step 5 – fold each of the seam allowances underneath the sleeve and cut the shape of the top and bottom of the sleeve. When you open out the seam allowances they will have an odd shape at the top but once sewn, the seam allowances will sit nicely at the top of the sleeve.

Step 6 – your new sleeve pieces. 
Step 7 – draw a long rectangle, 2.5cm in depth and at least 60cm wide.
Step 8 – find the middle of this shape and mark your finished cuff width (our finished cuff width is 30cm so at the middle of this rectangle we marked 15cm on each side). Where you draw the lines for the finished cuff width will be where the sleeve edges will fit – mark these lines at “slits”. So, in other words, the middle section of the shape is your finished cuff and the sections either side will be the ties.
Size 1 (UK 8) = 29cm
Size 2 (UK 10) = 30cm
Size 3 (UK 12) = 31cm
Size 4 (UK 14) = 32cm
Size 5 (UK 16) = 33cm
Size 6 (UK 18) = 34cm

Step 9 – On each side of your finished cuff width measure 16cm and draw a straight line. Then, add on 1cm all the way around this rectangle which is your seam allowance.
Step 10 – On the left-hand side you can now draw the curved edge of the tie.
Step 11 – cut out the left-hand side shape and trace it on to the right-hand side so that both curves are the same.

Your pieces are now ready to be cut out of fabric. You will need two tie straps per sleeve. Mark your 7cm points at the hem of each sleeve side. Also, mark the slit lines (very important!).

Step 12 – sew your sleeve together, stopping and reverse stitching at the 7cm mark and then iron open your seam allowances.


Step 13 – Following our image, place one side of the tie wrong side down, lining up the slit marks with the opening at the sleeve.
Step 14 – following our images will really help you with this section. We want the bottom edge of the tie and the bottom edge of the cuff to meet up – see below – making sure that the slit mark is exactly on the edge of the folded over sleeve edge. We have folded the left hand side of the sleeve away in this image:

Step 15 – place the tie against the sleeve edge and match up the other slit / finished sleeve edge.
You can then pin the tie to the sleeve.
Step 16 – Sew these edges together, using a 1cm seam allowance.

Step 17 – turn to the right side.
Step 18 – place the other tie, right sides together onto the sewn tie section and pin in place. Lay your piece as shown – see where our yellow pin is (hiding just underneath the white one!) – this is where we are going to start sewing.


Step 19 – when you reach the sleeve edge, keep your needle in the fabric and then have a look at the next few image to see what to do. We are going to flip the sleeve so that we can see the seam allowance underneath. Roll up the sleeve and push it inside the strap section so that you can keep sewing the two strap edges together.


Step 20 – Sew as far as you can and then reverse stitch. You’ll end up with the sleeve rolled up inside and it will look like a little sausage!
Step 21 – Pull out the sewn section and out will pop your sewn up side (you may need to use a pencil to help push it out)
Step 22 – repeat on the other side, sewing as much of the tie to the sewn tie/sleeve section.


Step 23 – there will be an unsewn section which you can hand sew or top stitch. Before you do this, iron this piece to really get the shape perfect.
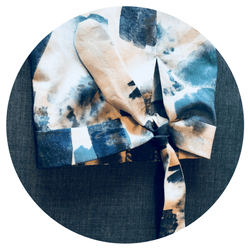
Tie your new sleeve ties – how pretty do they look!


If you haven’t tried the gathered cuff versions click on the image below to see how to make this gorgeous sleeve feature: