
Hello Avid Seamstresses.
In this article we’re going to take a better look at sewing patterns. The world of sewing patterns is huge, and for someone new to sewing it can be incredibly intimidating. How do you know what to choose? Is it the right skill level for you? What do you need to make the garment? Where do you even start?
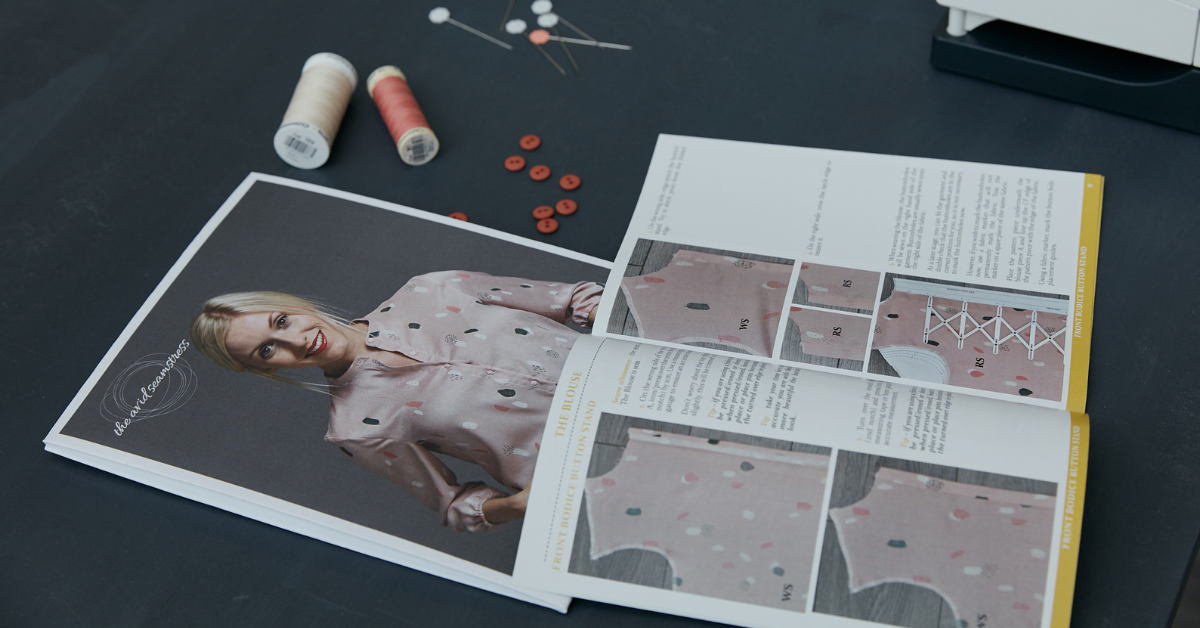
Usually, the front cover of a sewing pattern (or the product listing online if you’re buying a PDF) will include a pretty image of the finished garment, either a photograph of the garment on a model, or as a detailed illustration. Sometimes this will be enough to make you want to buy the pattern but, often, key information lies elsewhere.
Make sure to turn over the pattern envelope (or search through the online listing) for key information. Firstly, does the sewing pattern indicate a difficulty level? This will give you a very good idea of whether or not a pattern is suitable for you. Beginner patterns are aimed at those making their first few garments. They will often teach basic construction methods to get you started. Intermediate sewing patterns are aimed at people that are confident using a sewing machine. They know the basics and have made a few successful garments, and now want to build on their skills with something more complex. We advise that if you’re new to sewing garments, pick something aimed at beginners as more complex sewing patterns may be confusing, difficult and could end up putting you off!
What else do you look at when choosing a sewing pattern?
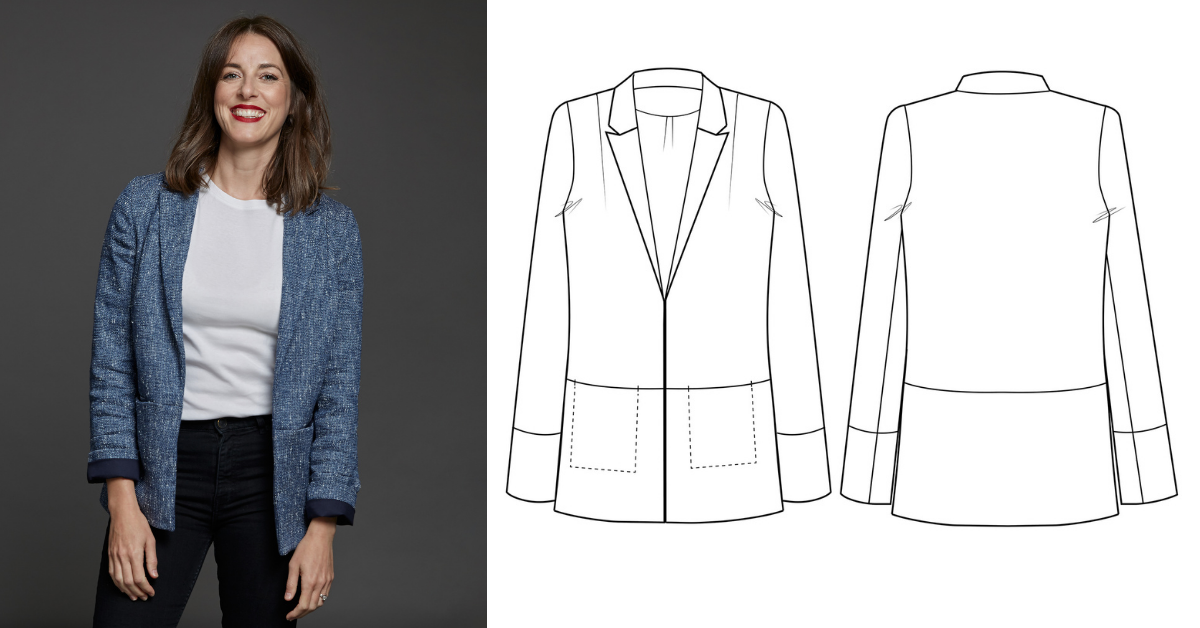
THE INDUSTRIAL DRAWING
The industrial drawing is a detailed line drawing of the garment. It shows you exactly what you’re making without the distraction of models and body shapes, fabrics, and backgrounds – it is a true representation of the garment. The industrial drawing also shows any key construction elements such as zips, darts, gathering, whether the garment has long or short sleeves and any other options that the pattern may include. Don’t overlook the industrial drawing, it really is a great source of information on a pattern.
THE DESCRIPTION
As well as the industrial drawing, a sewing pattern should also have a written description. This description includes important information about the pattern, as well as key design and construction elements.
Here’s an example from our Blazer sewing pattern (we’ve underlined the important words):
Introducing your next essential sewing pattern, The Blazer.
Ready for any occasion, The Blazer is an indispensable garment that you can wear to work, on the school run, paired with jeans for a busy weekend or around your shoulders for a chic night out. What‘s more, The Blazer sewing pattern can be made from a variety of fabrics meaning it‘s perfect for year-round sewing.
With a stylish relaxed fit, The Blazer features shoulder darts, front pockets, panelled sleeves and is fully lined. It‘s a great introduction to tailoring and is aimed at intermediate seamstresses. You‘ll learn key skills such as constructing and sewing a blazer collar, setting in panelled sleeves and putting together a fully lined garment.
Pattern sizes – UK 6 – UK 22
Skill level – Intermediate
FABRIC REQUIREMENTS
If a sewing pattern is suitable for multiple types of fabric, the designer will suggest options for you on the envelope or within the instructions. This will include the weight of the fabric (e.g. lightweight cotton), whether or not the pattern is suitable for direction prints such as stripes or plaids, and if the pattern is suitable for knit (and/or stretch) or woven fabrics. The key thing to take from fabric recommendations is to stick to knit, stretch or woven fabric, as the pattern recommends. Deviating away from fabric recommendations could end up in disaster for your garment.
OTHER SUPPLIES NEEDED
It’s incredibly important to take note of other supplies you will need to complete a garment. This information will be on the pattern envelope, or within the instructions if you have bought a PDF sewing pattern.
Don’t make assumptions with supplies. For example, if a pattern requires a zip, it will specify either a regular or invisible zip at a particular length. Do not deviate from this as the pattern has been designed with that specific closure in mind and may not work with a different type. Garment construction also plays a part here as, in this case, regular zips and invisible zips are sewn using different techniques. Similarly, ensure that you buy the correct size buttons, the correct width of bias binding and the correct type of interfacing. All of the information will be provided with the sewing pattern.
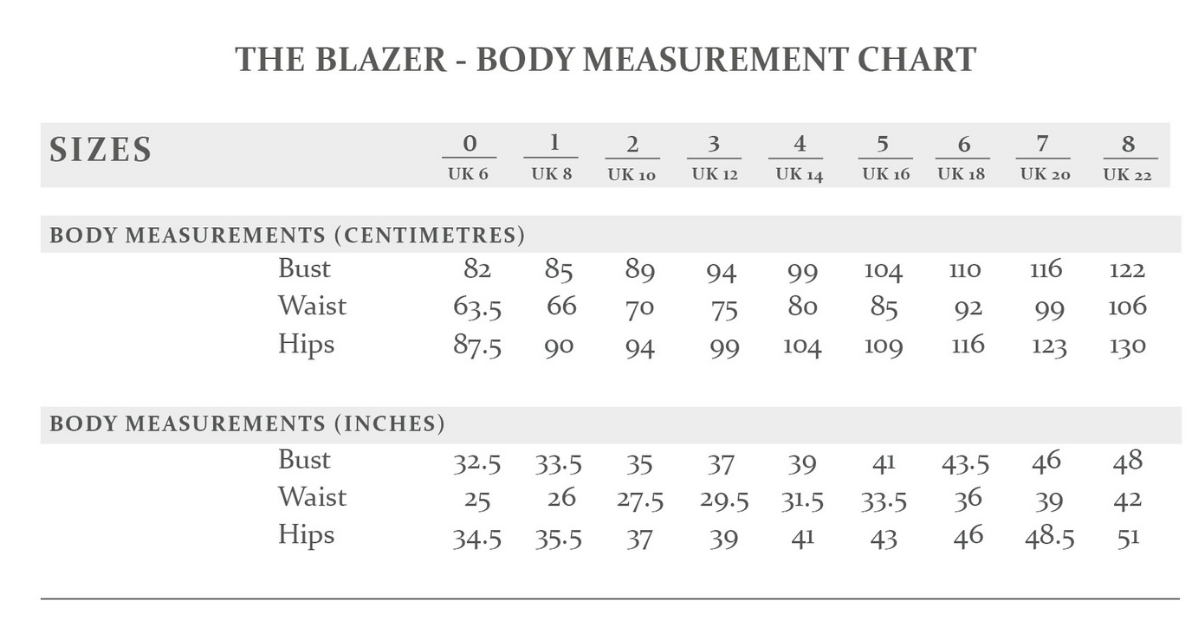
BODY MEASUREMENTS CHART
Every sewing pattern company uses a different body measurement size chart, so never assume your size. As the saying goes, measure twice, cut once.
Another very important thing to note is that you will rarely be the same size as what you will buy in the shops. Never assume that if you are a size 8 in the shops, that your pattern size will correspond.
We’ll go into more detail in our next article about measurements and how to correctly measure yourself as there is a lot to cover. But the first thing to check when choosing a sewing pattern is to ensure that the size chart covers your body measurements (don’t go by your regular shop size!). Another thing to note is that some companies offer their extended/plus size range as a separate product.
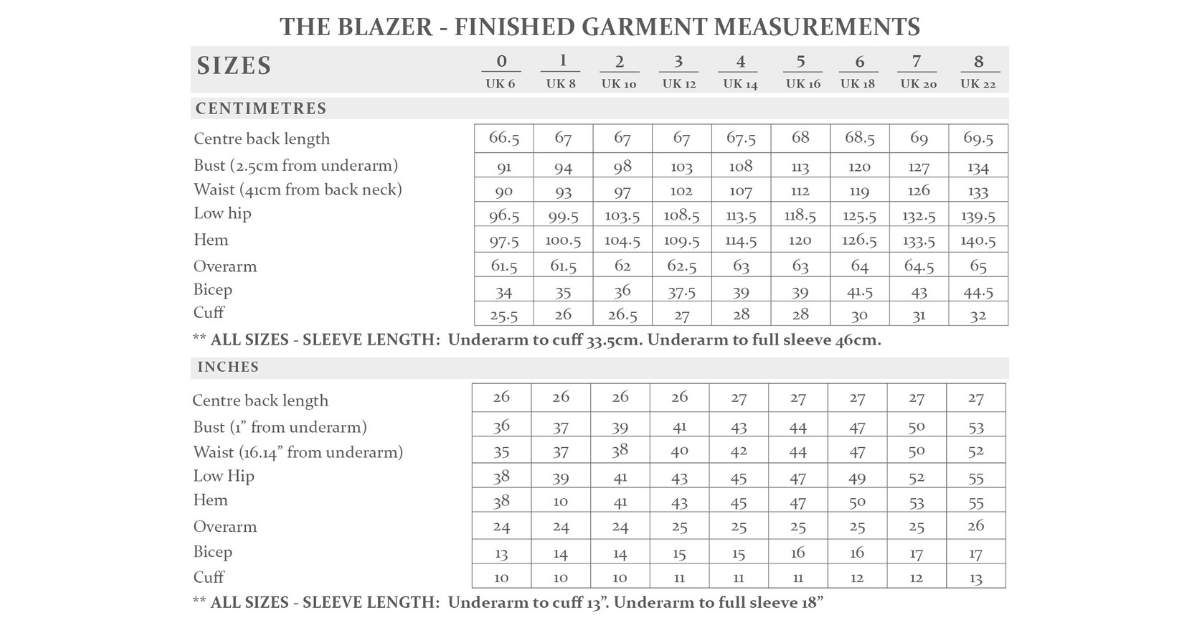
FINISHED GARMENT MEASUREMENTS
The finished garment measurements are larger than the body measurements so that there is room to move when wearing the garment. Some garments have more ease in them than others and the style of the garment will determine how much ease has been added. Once you have taken your body measurements, refer to the finished garment measurements – either printed on the pattern envelope or provided seperately. You can now determine which size you will be making as you can compare between the body and finished garment measurements. Locate the size that is closest to your body measurements, depending on the fit of the garment.
Finding a sewing pattern that inspires you is such a great feeling. The fun part is choosing the fabric you’ll be using. This is your chance to let your imagination flow wild and your creative juices flow and an opportunity put your own stamp on your personal style.
In summary,
- Always take the time to read the pattern envelope completely (or the instructions with a PDF pattern).
- Always follow the requirements listed by the designer – if the pattern requires an invisible zip, don’t go a buy a regular zip! Similarly, if the pattern requires stretch fabric, don’t buy non-stretch!
- Always re-measure yourself before starting a new project – don’t assume that you will be the same size as your last project.
Finally, don’t be afraid to ask for help. Whether you’re shopping in store or online, there’s always someone on hand to help you out with any questions you might have. We’re always happy to help too and can be reached at hello@theavidseamstress.co.uk
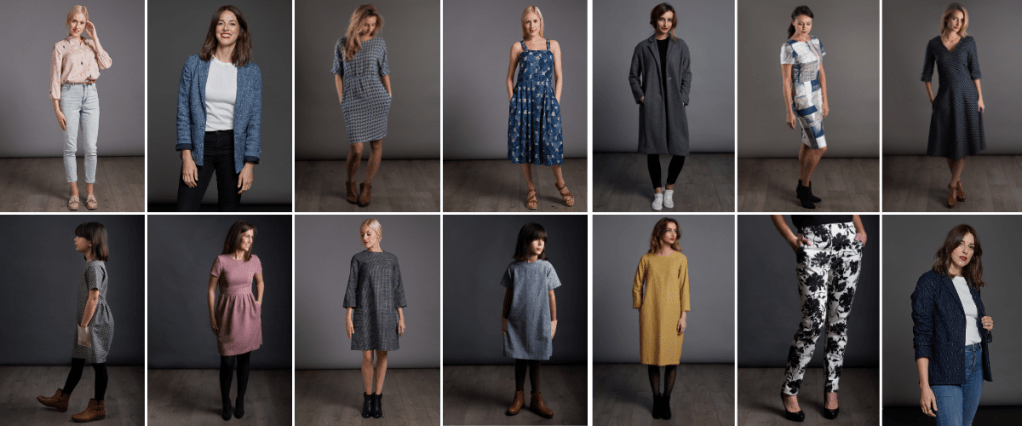
If you fancy some inspiration in choosing a sewing pattern, head to our collection ranging from beginners to advance. We’ll guide you through every step of creating a garment and you’ll have fun along the way.


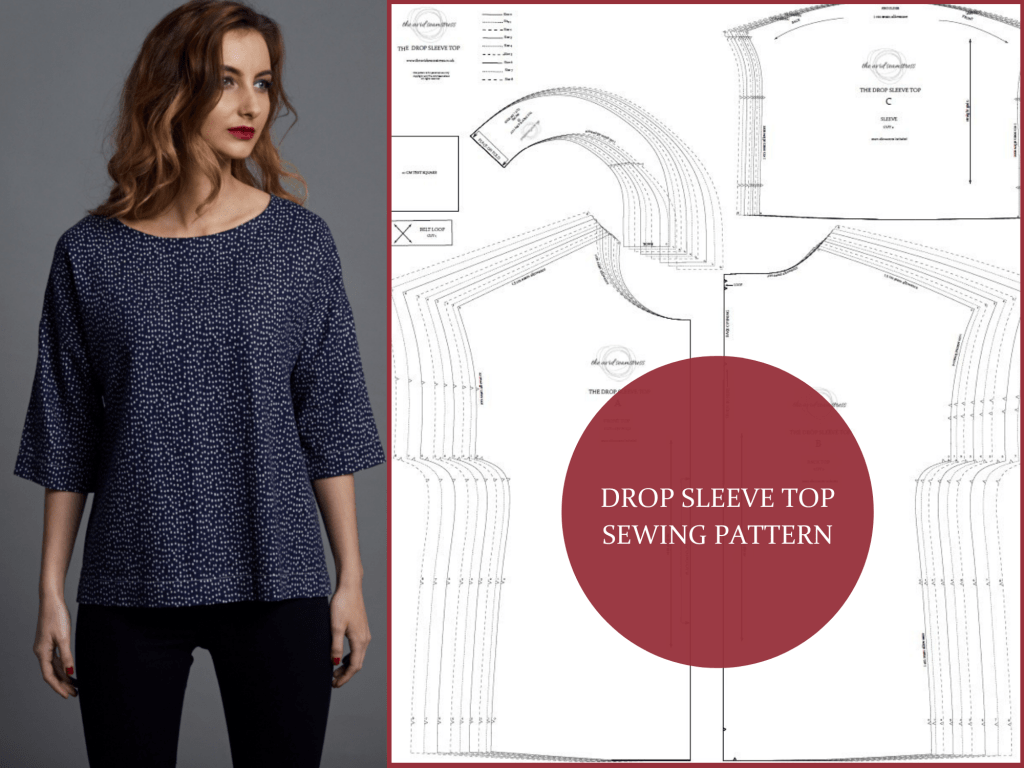
Fancy a free digital sewing pattern? Join The Avid Seamstress community today via our newsletter and be the first to hear about new releases, helpful tips and tricks, and special offers. You’ll also receive The Drop Sleeve Top digital sewing pattern completely free. Simple head to our website and you’ll either see a pop up screen or enter your email in the footer of the website. The Drop Sleeve Top is a great first make and, with our colour photography guiding you through every step, you’ll be on your way to making your first garment.
Our community is at the heart of everything we do here at The Avid Seamstress, and what better way to celebrate our incredible community than creating a space just for you and your Avid Seamstress creations. For a dose of inspiration, head over to @theavidseamstressmakers to see what Avid Seamstresses from around the world has been making with our patterns. Grab some fantastic ideas for fabric, patterns hacks and to see what our patterns look like on different shapes and sizes.⠀Our Facebook Makers Group is another place to connect, share your Avid Seamstress makes and meet a group of fellow makers.
If you’ve been wanting to try dressmaking but unsure where to start, we’ve put together some tips on making your sewing journey the best experience possible. Read our next article with some great tips that will support you on your sewing journey – read here.

Looking forward to more blog entries – it’s great to see so many wonderful resources like your website for people who love to sew!
Thank you Lisa! We know how daunting it can be and especially these days when the market is flooded with so much information. We are very happy to help!